Monthly Archives: February 2012

Lady bug cake


Beaux- tie ( kids recipe)


My daughter just loves bugs. All bugs. The craze started when she was about 2 yrs old. The phase has never ended. (6+ yrs later).

My husband and I attempted a bug cake. I’m not a recipe book lover in general, so I don’t own the famous Womens Weekly cake book. I prefer to just make stuff up and invent recipes most of the time. This is an adaption of a muffin recipe.

2 cups self raising flour
1 cup milk
2 eggs
1 cup sugar
1/2 cup oil
Vanilla essence
(Bake at 180 degrees for half an hour. )

Mix all ingredients together with electric beater and pour into a round glass bowl lined with baking paper.


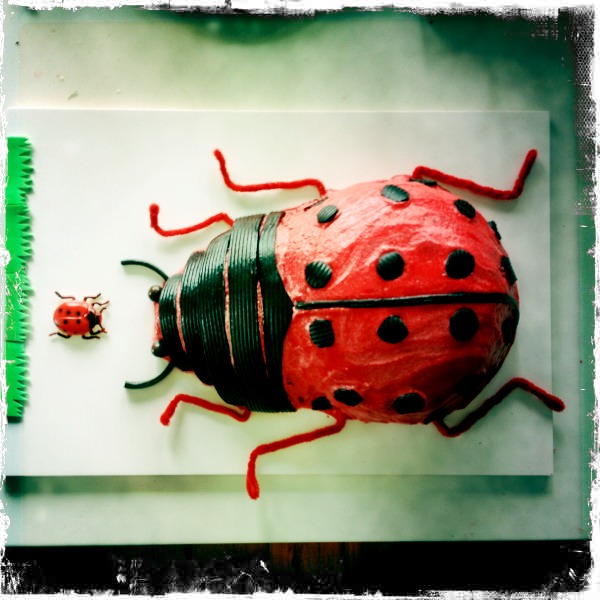
This round shape will be the lady bugs body when cooked. I also baked a smaller round shaped cake at the same time. This was for the bugs head.


I mixed red butter icing in a bowl. It did look awful. That bright red. Eeek. !!! Yes the red coloring stains!!!


Next step was to ice the lady bug with red icing and cut strips of black liquorice for the dots on the back.
I simply bought a flat roll of liquorice and used scissors.


To keep butter icing spreading on smoothly it helps to have a cup of boiling water next to you as you ice the cake. Keep dipping knife into hot water.


I made a mud cake at the same time so I didn’t have to eat that awful red icing. See best mud cake previous blog.

I bought red pipe cleaners from the craft section at the shops. These I used for the lady bugs legs.


The lady bug eyes were chocolates and liquorice laid on wet icing as seen above.


Next was the black dots on lady bugs back and a thin strip of liquorice to indicate the wings. Then some fake green grass on the white platter and press in the pipe cleaner legs.


Eden and her school friends thoroughly enjoyed this cake. She took bug cup cakes to school on the day of her birthday as well.

Funny – as I’m typing this blog she came up to me with a new “pet” …. A moth. She said , “Mum, meet Rosie. I hid her under my desk all day at school so the teacher wouldn’t see and make me throw her in the school garden.”
Yes that’s my little bug – lover!!

This is another brown moth named Rosie too ( below).


Happy baking everyone.

Leave a comment

Filed under Beaux-tie

Pastry fun


Beaux- tie. ( fun food ideas with kids)


I was a late discoverer of puff pastry. So this blog may be a “no- brainer” for many of you. But for the few out there like me who didn’t know the wonders of a pie machine etc. …… Here goes!


We were given our little pie machine for Christmas a few years ago. What a brilliant pressie. ( thanks mum). I reckon a pie machine is a must. Especially for those days when you are stuck for dinner ideas or time. Or if you have only a little left overs and not enough for a whole family meal. Popped into pies, makes the perfect dinner with a side salad. If you have a little Spag Bol mince left over or some left over Thai curry, these are perfect fillers for pies.


My girls like plain cheese or cheese and chicken or tuna. The idea came from Angelina ballerina, a dancing mouse on TV. She loves cheese pie to eat. And so my girls decided they were dancing mice one day and wanted mum to rustle up a cheese pie. I simply grated the cheese and filled the pastry cup.


The pie machine comes with a pastry cutter and you press out the tops and the bottoms out of the defrosted pastry sheets.


Place the bottoms into the pie machine as seen above. Then the fillings (this can be sweet or savoury; blueberries and custard is a good desert idea).
Then place the little pastry lid on top , as seen below.


The pie machine seals the pie shut. Green light flashes when pie is ready.


We also tried making our own sausage rolls the other night. What a great success.

I got the girls involved and they loved it.


Eden helped me cook up some mince. She felt like a real little chef.


We added a tub of this tomato relish to flavour mince as well as garlic and salt and red onion. It was delicious.


Next we placed mince in centre of pastry and rolled it together to make the actual sausage roll.


Eden was most proud of this. See the look in her face. Especially the rose she crafted out of pastry to decorate with (leaves and all).


We placed four sausage rolls on baking paper, on an oven tray and baked at 200 degrees for about 20 mins. Until golden.


Miss Jessica (my younger daughter) did not like the sound of Angus Beef Mince. She was determined to only eat cheese pie and leave the sausage rolls for the rest of us.


But she wanted “a little sugar “. And so our pastry desert idea emerged.


With play dough cutters she cut shapes out of the pastry. Next we brushed a little milk over the top to wet the surface and this enabled her to decorate the shapes.


We cooked these up for desert.


They puffed up beautifully and tasted so yummy. Daddy was most impressed to come home and find a home made dinner from his girls. Sausage rolls and salad for mains followed by 100’s & 1000’s pastry butterflies and ice cream for desert.

Yes I know…. not the most healthy dinner in the world. But it was amazing quality time spent with the girls, being creative together and working as a team.
This is great for a quick afternoon tea idea too, for kids.


You can also do brown sugar instead. Yummmy.
Enjoy the wonderful world of puff pastry. There is loads more you can do with it. Xxx

Leave a comment

Filed under Beaux-tie

Chair bag


Beaux- quet ( craft project for kids)

Chair bag!!


I have been dying to do a blog…. And have so many ideas busting to be uploaded. But Christmas came sweeping in and we went away on holiday for almost a month and then school started….. And seven family birthdays in the last few weeks!
All a bit crazy. No time to blog!

Not to mention , my “baby” leaping into the world of BIG school.
Any mums out there shed a little tear??? I did.


One thing the girls had to have for school was a chair bag.

So with my eldest daughter Eden ( turned 8 yesterday!), we did a little old fashioned stitching to decorate her chair bag.

What an absolute hit this sewing thing is. It’s a “new” form of craft without the mess of paint and glitter etc; and all threads can be vacuumed up easily at the end. And it’s so easy and effective.
Even 5 yr old Jessica is into it.


This is Jessica’s start of stitching a tea party as a cushion cover.


We got the idea from my black and white tea pot. Drew a circle on the polka dot fabric with a pen. Then cut out the circle and stitched it on with the handle and lid.


We got this little, cute sewing kit from the shop called “Typo”. It was part of Eden’s Christmas pressie, together with a whole lot of fabrics I bought her.


We store all the fabrics and ribbons and bags of buttons in a little pink and white striped sewing box.


As you can see from the close up shot, the sewing is nothing too complex or ” crash hot!”. Gotta lower the bar when it comes to littlies stitching….. Just in and out, in and out through the layers of fabric.
Pinning stuff in place first helps alot.


For the steam coming out the tea pot – I drew it in pencil first on the fabric and I helped Jessica by doing this bit.


Eden just got a new pet blue budgie. So hence, the blue bird theme and love hearts. She is in love with her new baby bird named Jewel.
She’s even been having budgie play dates with friends who bring their budgies to play.


Great low maintanance pet – I highly recommend. Hours of fun. Tip: buy a baby one, not a fully grown one as they don’t tame as easily.


Back to the chair bag. Basic shape like making a cushion cover. See two sides and have extra fold to attatch chair bag to actual chair.


Books go inside and it hangs off the back of the chair as seen above. Great for home work books at home and storage. As well as school chair bag.


Eden stitched bows and buttons and layered love hearts onto the fabric, as well as her bird.
We ironed the sides of the pink fabric underneath and then sewed it onto the red chair bag.


Happy days…. Just had to post this shot on my blog. My girls with my new vintage tea cups and having afternoon tea together with the pet budgie, who is sitting on my fake birds tail in right of photo. Celebrating first day of big school. Whewwww. We made it.
Happy stitching, and promise it won’t be months till my next blog.
X Jo

1 Comment

Filed under Beaux-quet